All-Inclusive Guide on What Does Flatten Mean on Cricut

One or several times, crafters can feel the need to combine numerous pictures into a single layer and print flat images. It is the point where Flatten comes into the picture. It is a function within Cricut that allows making multi-layered designs into a single layer for the print function. This guide is helpful if you are new to this term or want to know “What does Flatten mean on Cricut.” Here, we’ll discuss Flatten, how to use this tool on Cricut, and many more.

What is a Flatten Tool?

Flatten is a feature in the Cricut Design Space. It enables crafters to cut intricate or layered designs using Cricut, saving time and energy. When you opt for the flattening function, you get to convert a 3D image to a 2D image. This tool cuts all elements of the projects at once, removing cut lines and retaining the original color of that multi-layered image. You can utilize it to make stickers, decals, etc. The process is time-saving and effortless.

What are the Salient Features of the Cricut Flatten Tool?

Some key features you can find while using this tool are discussed below. Please note the feature can vary depending on the version of the machine you’re using.

This tool makes any image type printable for the Print-Then-Cut function.

Converts layered images into a single-layer image without compromising on pixels or size.

Utilizing this fantastic tool, you can remove the cut lines and images’ colors.

How to Use the Flatten Tool with Easy Steps

After understanding “What does Flatten mean on Cricut,” how to use it now comes. The basic steps involved in the usage of this feature are explained below. You can follow them carefully for your next projects.

  • First, launch Cricut Design Space and then start your new project. Ensure to keep 2 or more layers (in a row) on the Design Space canvas.
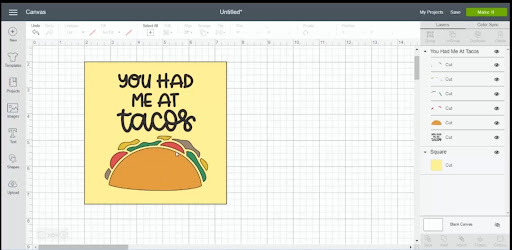
  • Select layers you want to flatten. You can see the selected layers displayed in the Layers section.
  • Once you select the layers, you’ll find a grey box displaying around the image.
  • Flatten box will turn black (active).
  • In the next step, move to the menu and choose Flatten.
  • Flatten button is under the layers panel on a Pc and the Active menu on iOS/Android phones.
  • Now, See your Results.
  • When you’re done selecting Flatten option, your photos will merge into a new layer.
  • At that layer, you will discover Print-Then-Cut operational label.
  • The last step is to rotate, modify or resize this layer similar to any other layer.

What Can Crafters Do with the Flatten Tool?

Are you familiar with Flatten tool but don’t know what you can do with it? Please find below some exciting projects you can start with this it.

Create Labels or Stickers

With the Print-then-cut function, you can create various labels and unique multi-colored stickers for personal and commercial purposes. It allows you to create several text types, backgrounds, and layering images. Address labels, plus container tags, are easy to create with this tool.

Make Realistic Mockups and More

Gorgeous and realistic mocks for sales pages are in demand. The flattening process lets you create and flatten the design on a mockup. You can then upload that flattened image onto a blank Design Space canvas.

Few Things to Consider While Experimenting with The Tool

When there is a complete discussion on “What does Flatten mean on Cricut,” how can we forget some important tips regarding this feature? Below we have collected a list of valuable tips.

  • This tool works only when there are overlapping or non-overlapping designs.
  • You can use this tool to work on one or more layers.
  • If no layer is selected, you will see a grey box.
  • When you use this tool, you cannot edit any individual later.
  • With these tips, you can create your project ideally without any damage. In the end, you will get the expected result from this tool.

Conclusion

Master the topic “What does Flatten Mean on Cricut” and get entry to doors of limitless possibilities. The tool is easy to use and includes many features to create projects such as home decor, wall clings, storage containers, and whatnot! DIYs are easy and time-saving. Make use of this tool today.

Frequently Asked Questions

What Object Types are Easy to Flatten Using This Tool?

Flatten tool is convenient to use for a wide variety of projects. It can be found in the Cricut Design Space. The tool allows the Flattening of several object types, ranging from basic shapes to text and images.

Is There a Difference Between Image Welding & Flattening?

Yes, there is a difference. Welding in Cricut Design Space merges selected layers into a single image of the same color while keeping edges cuttable on any material. Flattening combines them into a single image of various colors. The new image in Flattening is cuttable after it gets printed.

Why am I Getting Flatten Greyed Out?

If the Flatten button isn’t functioning or is greyed out, you haven’t selected the visible layers. Ensure you’ve chosen an image and picked more than one layer.

Visit: cricut.com/setup
cricut setup explore air 2 setup
cricut.com setup mac
design.cricut.com/setup
cricut design space setup

How to Install Cricut Explore Air 2 on Your Device?

Are you looking for a way to install Cricut Explore Air 2? If you just have bought a brand new Cricut Explore Air 2 machine, it is a perfect choice. Cricut Explore Air 2 is one of the most popular and demanding machines. If you want to set it up, you can do it easily by following our latest blog. Design Space is an important element in installing the Explore Air 2 machine. To set up your machine, you will need to install it on your device. It will take less than a minute. Let me brief you on this for those unaware of the Explore Air 2 machine.

What is a Cricut Explore Air 2 Machine?
The Cricut Explore Air 2 cutting device allows you to cut Over 100 different materials. This machine can handle any material, including leather and cardboard. It has automatic settings for more than 80 different types of fabrics with a maximum cut size of 12″ x 24″. It also includes a rapid mode for quicker cutting and Bluetooth connectivity.


For individuals who prefer DIY projects and crafting, the Cricut Explore Air 2 is ideal. It can easily and precisely cut complicated designs. For individuals who do not enjoy crafts or who do not need to cut a range of materials, it might not be the best machine.

How to Get Design Space on Your System?
Downloading and installing Design Space is a work of minutes, and one can do it effortlessly. You can get the Design Space on any operating system. We are emphasizing the Windows system. Similar steps will be performed on the Mac. If you want to get it on your iOS or Android, download the Design Space app from the respective app store and go ahead.

  1. Go to the official Cricut website by opening your computer browser.
  2. To download the Design Space software, tap the Download icon.
  3. Go to the download location on your PC after the download is finished.
  4. To begin the installation procedure, click the downloaded file.
  5. To finish the installation process, adhere to all the additional screen instructions.
  6. Open the program and log in using your Cricut credentials.
  7. Create a Cricut ID if you don’t already have one, then choose your machine.
  8. Install the most recent firmware on your system.
  9. You can enroll in Cricut Access if you wish to access more features.
  10. Cricut Access or Membership is available with a free trial.

This is how you can get Design Space on your device. Once you complete setting up the Design Space, it’s time to install Cricut Explore Air 2. Then, you can try the machine’s efficiency by making a project.

How to Install Cricut Explore Air 2?
To install your Cricut Explore Air 2 to set up a project, you need to start by unboxing your machine and following the given steps.

  1. Unbox your Explore Air 2 and take off the protective coverings.
  2. Ensure the box has all the necessary components such as cables, power cord,
    instructions manual, etc.
  3. Then, connect your Cricut machine to the power source and turn it on.
  4. Use the cable/Bluetooth to connect the machine, which you get inside the box.
  5. Head to cricut.com/setup and go with the on-screen directions.
  6. The screen will guide you enough throughout the procedures.
  7. After that, download and install Design Space (see the above section).
  8. Then, register yourself in the Cricut account.
  9. You can also create a new account if you don’t have one already.
  10. Take free trial access from the website.

Hence you have successfully installed your Cricut Explore Air 2 machine. After that, you can make your first project using your machine and device. However, if you are setting up your machine for the first time, you must create a Design Space account. If you don’t know, you can learn from here.


How to Create a New Account in Design Space?
Every user should know the process to create a new account on Design Space on their machine. With the help of an ID, you can easily sign into your account each time you set up your machine. Hence, follow the steps to create a new account in Design Space.

  1. First of all, go to your browser and search cricut.com/setup.
  2. Then, click on Create Cricut ID.
  3. Now, supply your email address.
  4. After that, supply your password.
  5. Type your full name.
  6. Select your country or region.
  7. After that, follow the directions.
  8. Complete the Cricut sign-in process.
  9. Lastly, you can use the Design Space software to make designs.

You have successfully created your Design Space account. After that, you can start creating designs in the software and make your projects.

Conclusion
Installing Cricut Explore Air 2 is easy to use and set up. You just need to download and install Design Space from the official website of Cricut. Start by unboxing your brand-new Cricut machine and checking all the necessary components inside the box. After that, connect your machine to a power source and to your device. Go to Cricut’s official website and download Design Space. Register yourself in the Design Space account. Make your first project and check if the machine works correctly.

A Complete Guide on What Can You Do With Cricut?

Are you wondering what you can do with Cricut? Well, this guide will resolve a lot of questions for you. You shouldn’t need to take any worries as this electric cutting material is a multi-tasker. It is also known as craft plotters or die-cutter machines that not only cut but also write & design different patterns/designs with speed and perfection.


In addition to that, this machine cuts different kinds of materials within a blink of an eye, making it most popular among professionals. There are various versions of this machine with unique features and capabilities. Get to know about the projects that the machine can craft from the following section.


Here are the Top 10 DIY Cricut Ideas to Explore
One of the important elements that help the user in formatting their idea in Design Space. It is a free application where the user creates their designs by using fonts, images & ready-to-use projects. With the help of this app, half of the creator’s tension gets decreased as they find the majority of their material in one place only. The top 10 DIY projects that you can create by using the Design Space along with the machine are available below:


Jewellery
If you are a fashionista person and love to add new items to your wardrobe, then crafting customized jewelry is the perfect option. Through the machine, you can design and craft the design as per your choice.


Home Decor
Everyone loves to decorate their home during the festive seasons by designing various types of decorative items using software along with the machine. Preparing the items personally gives positive vibes to the environment.


Cake Toppers
Celebrating special occasions is a wonderful experience by cutting cake to make it sweeter. Decorating cake is an art, but designing craft toppers is quite exciting. You can create the cake toppers as per your preference considering all the elements like shape, weight, height & design.


Customized T-Shirts & Caps
You can be more innovative when it comes to creating creative and unique designs with the new machine. These days customized t-shirts & caps have received tremendous love from audiences. You can create your design on the program and then start the cutting process.


Pillow Covers
Specially designed pillows also help the user in enhancing their crafting skills and add new items for bedroom decor. You can create the pillow cover by using infusible ink or iron-on vinyl. In addition to that, you can also give the pillow cover as a gift to your loved one.


Tote Bags
These days Tote bags have become a necessity in everyone’s life as you can use the bag for various purposes. It isn’t a difficult job for the machine to craft out the tote bags as you’ll be provided with so many styles and images.

Customized Phone Covers & Pouches
You can use the machine to create customized phone covers as well as pouches. You can show off your phone cover or pouch by designing them as per your choice by selecting the material, image, and other settings on the machine.


Wall Art
If you love to decorate your house, then attaching different kinds of artwork/motivational quotes works for you. All your needs about the wall art can be satisfied by using this electric cutting machine and creating the design on the Design Space.


Pet Clothes
Are you a pet owner and love to dress in different clothes? Then you must choose this machine before buying the clothes from the market. The machine allows you to design the cloth according to the instructions assigned to it.


Bookmarks

Are you a bookworm and obsess about keeping them safe and in good condition? Then making a bookmark is your necessity. You can easily create the bookmark by using cardstock or paper, depending upon your choice.
After learning about the best creative DIY projects, you can also use this machine by starting your small business. You can read the following section to learn about the projects that can help you design Cricut machines.


Projects to Sell by Using Cricut Machine

Becoming financially independent is very important for everyone. Many people start their business with a small income and groom it in every possible way. If you have this machine, then you can also become an entrepreneur by taking orders in bulk from the audience. Here are a few ideas that can help you establish your business in the crafting industry:

  1. Custom Letterboxes.
  2. Leather Bags.
  3. Fabric Buntings.
  4. Monogram Necklace.
  5. Mugs & Caps.
  6. Terra Cotta Pots.
  7. Water Bottles.
  8. Keychains.
  9. Tropical Tray.
  10. Iron On Straw Bag.

You can promote your crafts on different social media platforms and earn a lot of money by delivering the order to the customers on time with the best quality without damaging the project.

Conclusion
As I have said in the article, you can not only brush up on your skills but also make money by using the machine. The machine has the ability to fulfill all your DIY projects by using its blades and different models. If you’ve any kind of questions, then don’t hesitate and see the FAQs shared below.


Frequently Asked Questions
Question: Is purchasing the Cricut machine a good decision to
make?

Answer: If you love to design various kinds of customized projects by considering materials such as wood, paper, leather, etc., then this machine is the best choice to be made. The machine can not only cut but also write & print as per the instructions.


Question: What are the items that are provided with the machine?
Answer:
While opening the Cricut machine box, you’ll see different items that can be used for crafting projects, such as blades, mats, pens, a user manual, USB cables, and charging cords. If you want to continue creating new projects, then you might purchase the items from the official website.


Question: Do we need to have a PC/Smartphone to use the
machine?

Answer: Yes, it’s compulsory for all the users to have a PC/Smartphone to access the Design Space and transfer their design to the cutting machine. Your device can easily get connected to the machine wirelessly or via a USB cable.

Visit: Cricut.com/setup
design.cricut.com/setup
cricut machine set up
cricut design space setup
install cricut explore air 2

How to Connect Cricut Device to Computer? [A Complete Guide]

Connecting a Cricut cutting machine to a computer seems easy to hard, depending on if you are doing it the first time. The process can be confusing if you are trying for the first time to connect it. Also, connecting it to a computer or mobile device is essential if you want to work on craft projects. Therefore, keep reading the following write-up to get complete information on how to connect a Cricut device to your computer and smartphone.

How to Connect Cricut to Computer Bluetooth?

The method of how to connect a Cricut to your desktop computer are as follows:

  1. First, plug in the Cricut to the power socket and then turn it on.
  2. Make sure to keep your device within the range of your PC or smartphone.
  3. If your computer device has Bluetooth connectivity, then you need to click on the start option. (You can use the Wireless Bluetooth Adaptor if it does not have Bluetooth connectivity)
  4. After that, you have to choose the Settings option.
  5. Then, click on the Devices option in the Settings window.
  6. Now, check if the Bluetooth is on and then select the option Add Bluetooth or other device.
  7. On the next page, choose Bluetooth and let your device scan for your machine. Then, select the option from the available option.
  1. Type the code 0000 when you are prompted to type the code. And then click on Connect option.
  1. Lastly, the Cricut cutting machine will be paired to your desktop computer.

How to Connect Cricut to iPhone?

Here are the easy and simple steps in order to connect Cricut to your iPhone device:

  1. First, power your Cricut machine and place it close to your iPhone device.
  2. Then, tap on the Settings option on the home page.
  3. Next, open the Bluetooth and check if it is on. (Enable Bluetooth if it is not on, and then wait for it to scan for the Cricut device.)
  1. After that, click on the available device option from the list.
  1. When you see the prompt to enter the code, type 0000 and select Pair.
  2. Finally, the pairing process is done on your iPhone device.

How to Connect Cricut to Design Space?

If you want to connect the Cricut to Design Space, follow the steps n the section below:

  1. Plug in your Cricut machine and press the power button to turn it on.
  2. Then, pair the device with your computer or mobile device via Bluetooth or USB cable.
  3. Afterward, you must go to Cricut’s setup page on any web browser.
  4. Next, you are required to download and install the Design Space app on your device.
  5. Now, sign in with your Cricut account and complete the setup process.
  6. Once the setup process is complete, you will see a message about performing a test cut.

How to Connect Cricut to Printer?

The inkjet printers are compatible with your Cricut machine. Here are the steps to connect the Cricut machine to a printer.

  1. First, you must launch the Design Space app and sign in using your ID and password.
  2. Next, click on the account menu (☰) option. And then click on the Calibration option.
  1. After that, you have to choose the Print Then Cut option.
  2. Now, you are required to choose the printer you like to use with the app.
  1. Now, you need to follow further instructions to print your design using the printer.

Frequently Asked Questions (FAQs)

Can Cricut run on a laptop?

Yes, you can use a Cricut device with the help of a laptop. Also, both Windows and Mac laptops are compatible with the Cricut machines. Apart from that, you can use your smartphone to finish a project if you do not have a laptop. To know if your device is compatible with the Cricut machine, you can navigate the official website of Cricut.

Can I use the Cricut machine without the setup?

No, it is not possible to use a Cricut device if you do not complete the setup process. You have to pair the device with your computer or mobile device using a USB cable or Bluetooth. Also, you need to install the appropriate apps, such as Cricut Design Space, Cricut Joy, and Cricut Heat app.

Why is my Cricut connecting to my computer device?

Here are various reasons for your machine not connecting to the computer. Here are some of them.

  • The distance between Cricut and the computer is more than 15 feet.
  • The Bluetooth is not on your PC.
  • You have not done the Cricut machine setup correctly.
  • The computer or its version is not compatible with the machine.
  • Your Cricut machine has some minor or major technical issues.

Visit: cricut.com/setup
cricut setup explore air 2 setup
cricut.com setup mac
design.cricut.com/setup
cricut design space setup

Design a site like this with WordPress.com
Get started